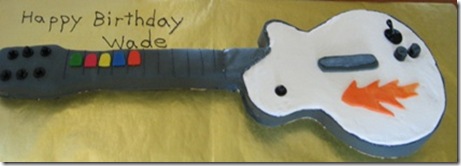
My son’s birthday party was this last weekend, and he really wanted a Guitar Hero birthday cake. I thought it would be really difficult to make, but it wasn’t too hard so I thought I would share the instructions here.
Add this cake to some rock star/ Guitar Hero party supplies and you have a party!
Here are the steps to make a Guitar Hero cake so you can be the hero at your child’s next birthday party:
What You’ll Need to make the cake:
- 3 to 4 cake mixes, or the equivalent if you use your own recipe (about 15-20 cups of batter).
- Wilton 12 by 18 by 2-Inch Baking Sheet
- parchment paper
- A double batch of butter cream icing
- fondant in the following colors (you can buy the colors already colored, or buy white fondant and color it with food coloring) red, blue, green, orange, yellow, black or dark grey.
How to make the Guitar Hero Cake:
- I started the cake by actually tracing around his Guitar Hero guitar with a pencil and some parchment paper. Once I had the outline of the cake I put it aside for later.
- I baked the cake in a 12×18 cake pan. I made half of the cake chocolate, the other half of the cake white. You will need 3 cake mixes to fill this size pan. You could also use a smaller pan and make two cakes, since you will have to piece the guitar together for any pan you use.
- Use parchment in the bottom of the pan, and spray the sides well with cooking spray before you pour the dough into the pan.
- Mix and bake the cake according to the recipe, or box directions. My baking time was between around 50 minutes for the larger pan. Set your timer for about 40 minutes then check the cake often after that until a toothpick inserted in the center comes out clean.
- Once you’ve baked your cakes turn them out of the pan onto a wire cooling rack to cool thoroughly.
- Once the cake is cool place the guitar pattern on top of the cake. Use a sharp serrated knife to cut out your guitar shape. You will not be able to cut the guitar all in one piece, you will probably need to make it two or three pieces, depending on the size of your original cake.
- Just mark on your pattern where you left off, and begin cutting the next piece at that point.
- Cover a large sheet of cardboard (large enough to hold your Guitar Hero cake) with silver or gold foil.
- Arrange your cake cutouts on the board to shape your guitar cake.
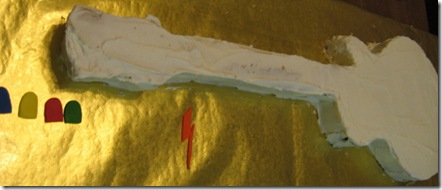
- Put a little icing under the cake to act as the “glue” to hold the cake in place on the board, then give the whole cake a base coat of white butter cream icing.
- Then give the top of the body of the guitar a second thicker coat of white icing. Don’t worry about putting a second coat of icing on the neck and sides of the guitar since you will be covering those with fondant.
- Set the cake aside, and start working on your knobs and buttons. Take a look at the actual guitar to determine the shapes of the buttons you need to make.
- Make your knobs with fondant. It’s kind of like working with clay. I made the different colored push buttons on the guitar neck by rolling out the fondant, making a pattern from the actual buttons with parchment paper then cutting the buttons around the pattern in fondant.
- I made a short whammy bar, you could probably make a longer one out of wire and fondant.
- All the other buttons were created by shaping the fondant by hand until it was the desired shape.
- I rolled black fondant out for the neck and sides of the guitar. I measured the depth and length of the sides, then rolled out a long strip of fondant and cut it to fit.
- I rolled another thicker strip of fondant for the neck of the guitar, then shaped it over the cake and cut off the excess. I had to work with the end a little bit to get it the right shape. I actually ended up putting an extra patch of fondant over the end to cover up some mistakes I made with the larger piece.
- Assemble the cake by placing your knobs in the proper location.
- I used 1/2 cup black butter cream icing, with about a teaspoon of piping gel in it to pipe the frets on the neck of the guitar when I was finished.
It was really a fun cake to watch come together at the end, because I had no idea how it would turn out. You could probably cover the main part of the guitar with fondant, but I love the flavor of butter cream and didn’t want the kids to taste the cake and say eeewwww!
The cake was a really big hit! I think this cake would work really well for a Rock Band party too. Just change the knobs to match your child’s favorite Rock Band guitar.
I have more Rock Band and Guitar Hero party ideas and supplies here.
Still more rock star, guitar hero party ideas.


7 comments
[…] used a combination of butter cream icing and fondant to decorate the cake. I posted the complete instructions for making a Guitar Hero cake at Kid’s Fun Reviewed. Share and […]
Wow Linette, you actually did it! Great job!! Did your son appreciate all your work?
It turned out GREAT! I hope it was the hit of the party!
[…] Guitar Hero Cake For all the Guitar Hero and Rock Band video game fans out there. https://sweetpartyplace.com/how-to-make-a-guitar-hero-cake/ […]
[…] Guitar Hero Cake~ The perfect birthday cake idea for all the Guitar Hero and Rock Band video game fans out there. […]
Great looking cake! I’ll bet it was a hit.
[…] kidsfunreviewed.com viaLinette on […]