

Today I want to share how to make DIY Chocolate Easter Eggs. I remember when I was a child every year at Easter we spent a day making chocolate candies. We had several chocolate molds, from eggs to Easter bunnies. We’d melt the chocolate in a double boiler, and make dozens of chocolate goodies for friends and family. We might have eaten a few along the way!

Some were solid chocolate, others were hollow, my favorites were the filled peanut butter or cream eggs.
I still enjoy the DIY chocolate Easter eggs tradition today. Every year my son and I spend a day melting and molding chocolates to make up little baskets for friends and family. They’re very popular!
Today I want to share some of the techniques we use, while I show you how to make some molded chocolate Easter eggs. Maybe you can start a tradition of your own?
DIY Chocolate Easter Eggs
Materials:
- Chocolate molds for Easter eggs or other shapes
- Melting chocolate in white or colors
- Food or chocolate coloring
- Several bowls
- Decorator or pastry bags
- Toothpicks and/or a small paintbrush (new or only used for food)
- Your favorite candy filling, homemade or purchased (peanut butter, cream, chocolate, ganache)
Instructions:
1. Melt the chocolates according to the package directions. If you’re using the microwave to melt your chocolate, only set the timer for 15 to 30 seconds at a time, and stir in between.
2. If you use white chocolate, add food color or oil based candy coloring or to make the colors you’d like in small bowls. You can also use the pre-colored chocolate wafers if you want to keep it simple.
You have to work quickly because the chocolates will start to harden as they cool. Work with a couple colors at a time. If your chocolate is hardening faster than you can use it, a couple seconds in the microwave will soften it back up.
Note: If the food coloring makes your chocolate seize up you can add a couple drops of candy color oil, or some wax crystals to the mix to make it flow better. You can find found both of these at the local craft store in the candy decorating section.
3. If you want to add different colors, or details to your chocolates, do that first. You can use a small paint brush (new or used only for food), or a toothpick to add tiny bits of melted chocolate to the inside of your chocolate mold. You can also use a pastry bag with a small round tip to fill in small details on your chocolates.

4. Once you’re done adding the details, fill the rest of the mold with chocolate. You can use a spoon, or a pastry bag to pipe the chocolate into the mold. If you don’t want a solid chocolate egg, you can also make eggs with filling in them.
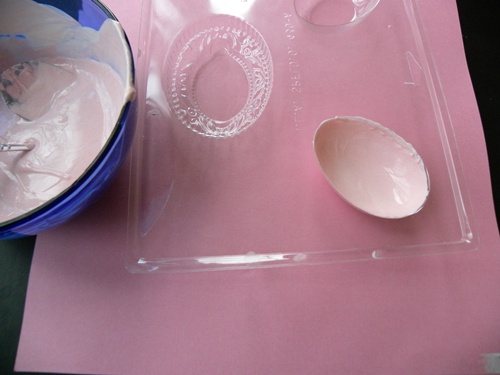
5. To make eggs with filling, pour a small amount of chocolate into the bottom of the mold. Tilt the mold from side to side until the entire shape is filled with a thin layer of chocolate all the way to the top edge. Set the mold aside to cool and harden.
6. Once the chocolate is hardened, add your favorite filling. There are many different filling flavors available, or you can make your own. Make sure you read the package directions, many fillings will need to be refrigerated. You’ll want to refrigerate any chocolates made with these fillings.
7. Once your chocolates have cooled and hardened you can remove them from the mold, by turning the mold upside down, and gently shaking them into your hand, or onto a clean towel or soft surface.
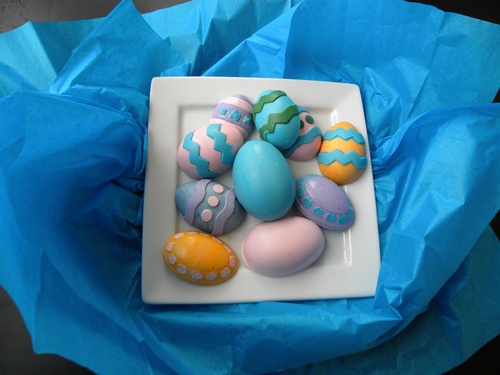
8. Use your molded chocolate eggs in an Easter centerpiece, add them to an Easter basket cake, or package them up to give to friends and family.

Party Patch tip:
Place your chocolates in small baskets with some other candy and give them out as party favors or Easter gifts to friends and neighbors.
Make edible Easter grass by adding green food coloring to shredded coconut.
To cool and harden your chocolates faster slip them in the refrigerator or freezer for a couple minutes.
Add your DIY Chocolate Easter Eggs to this fun Easter basket cake.
